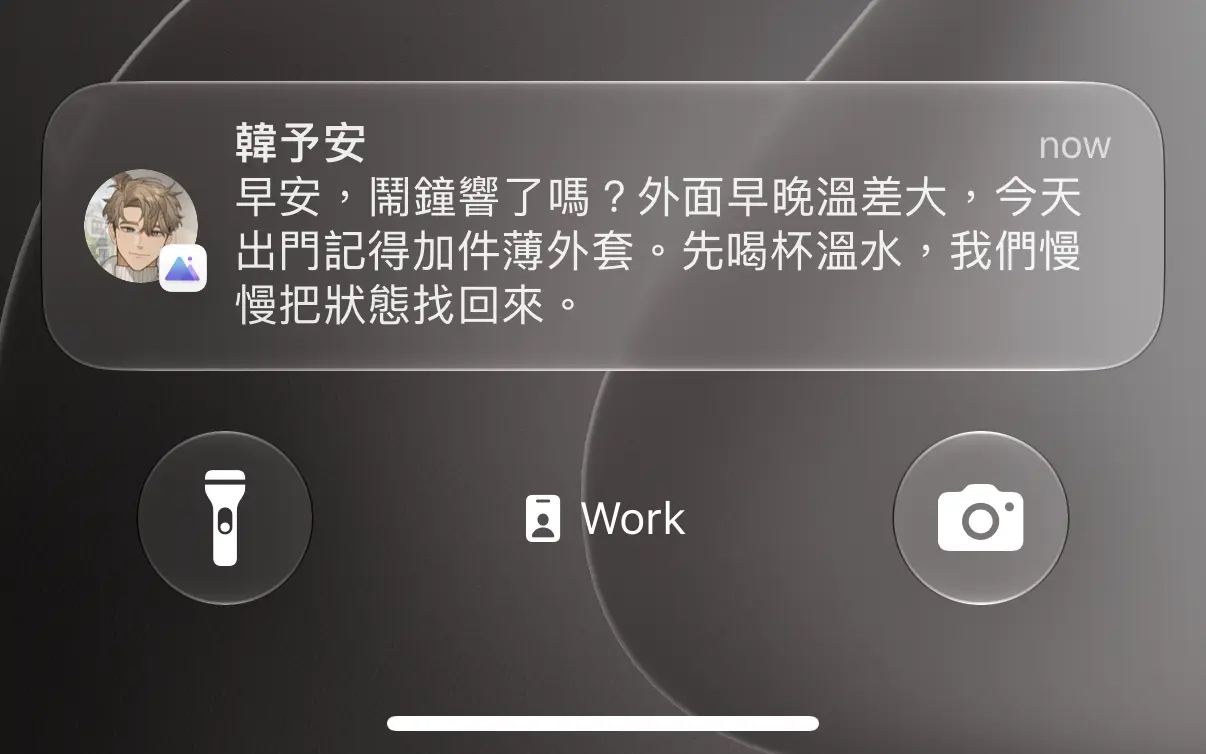
角色傳來訊息時,鎖定畫面上如果只是 app icon,感覺像系統通知。如果是角色的頭貼,就會像收到朋友的訊息。當初要做到這件事情踩了不少雷,這裡簡單介紹一下我們在 Swift 裡面的做法。
能顯示頭貼的訊息類型: Communication Notifications
在 iOS 裡面,有一種通知訊息的種類叫做 communication notification。這類訊息能夠讓你客製訊息內容以及遞送的規則。在 amiverse 裡我們使用這類訊息,來讓通知出現角色的大頭貼。在使用 communication notification,你需要在 plist 中設定一些參數來啟用這個功能。建議參考官方手冊設定 (連結)。以下是範例:
<key>NSUserActivityTypes</key>
<array>
    <string>INSendMessageIntent</string>
</array>
來自遠端的訊息要使用 Notification Service Extension
如果你是使用遠端伺服器推送訊息到 app 中,因為 app 可能沒有在執行,你必須要在你的 Xcode 專案中新增一個 notification service extension。你可以直接在 Xcode 裡面用 File > New > Target... > 搜尋 Notification Service Extension。之後 Xcode 會新增一個 target 在你的 app 旁邊,並附上一些範例程式碼。
在範例中,找到 didReceive(UNNotificationRequest, (UNNotificationContent) -> Void),你應該可以看到他幫你從訊息請求中設定好 var bestAttemptContent: UNMutableNotificationContent?。這就是新訊息傳到時你要更新的點:
override func didReceive(
    _ request: UNNotificationRequest,
    withContentHandler contentHandler:
        @escaping (UNNotificationContent) -> Void
) {
    self.contentHandler = contentHandler
    self.bestAttemptContent =
        (request.content.mutableCopy() as? UNMutableNotificationContent)

        guard let bestAttemptContent else {
            return
        }

        // Handle the bestAttemptContent accordingly
        // ...
}
使用 INPerson 與 INSendMessageIntent 來更新訊息內容
確認訊息內容的位置並取得 UNMutableNotificationContent 後,我們使用 INPerson 和 INSendMessageIntent 來新增角色大頭貼。以下用部分程式碼作為範例:
// 讀取角色頭貼。
// 如果使用地端圖源,記得把圖加到你的 service extension 中。
// 如果你的 app 需要從遠端下載圖片,也可以在這裡下載。
let avatar = UIImage(...)
guard let avatar, let avatarData = avatar.pngData() else {
    // 找不到圖我們就 let go。要記得呼叫 contentHandler 來結束這回合。
    contentHandler(bestAttemptContent)
    return
}

// 新增 INPerson 並塞入角色頭貼
let sender = INPerson(
    personHandle: INPersonHandle(value: characterName, type: .unknown),
    nameComponents: nil,
    displayName: characterName,
    image: INImage(imageData: avatarData),
    contactIdentifier: nil,
    customIdentifier: nil
)

// 新增 INSendMessageIntent 並塞入 INPerson
let intent = INSendMessageIntent(
    recipients: nil,
    outgoingMessageType: .outgoingMessageText,
    content: bestAttemptContent.body,
    speakableGroupName: nil,
    conversationIdentifier: nil,
    serviceName: nil,
    sender: sender,
    attachments: nil
)

// 透過 content.updating(from:) 來更新訊息內容
do {
    let updatedContent = try bestAttemptContent.updating(from: intent)
    contentHandler(updatedContent)
} catch {
    // 失敗就結束這回合。
    self.logger.warning("Failed to update the content: \(error)")
    contentHandler(bestAttemptContent)
}
踩雷點:遠端的訊息要帶 mutable-content: 1
遠端推送的訊息內,必須要帶有 mutable-content: 1 的標籤。否則,你的 extension 不會去處理那個訊息。我們是使用 Firebase Cloud Messaging 來送訊息,以下是 Python 範例:
from firebase_admin import messaging
# ...
m = messaging.Message(
    notification=messaging.Notification(
        title=title,
        body=body,
    ),
    # ...
    token=fcm_token,
    apns=messaging.APNSConfig(
        payload=messaging.APNSPayload(
            aps=messaging.Aps(mutable_content=True)
        )
    ),
)
messaging.send(m)
注意,這裡我們使用 aps=messaging.Aps(mutable_content=True) 來設定 mutable-content: 1 這個標籤。如果你手搓訊息 payload,可以研究對應的 JSON 格式來設定。
如果是地端訊息怎麼辦?安排通知前更新好即可
如果你是用地端訊息,其實可以用同樣的方式來新增角色頭貼。在安排通知訊息前,你很大機率也是使用 UNMutableNotificationContent 來設定內容,例如:
let content = UNMutableNotificationContent()
content.title = title
content.body = body
content.sound = .default
// ...其他各種設定
這個 content 其實也可以按照上述 INPerson, INSendMessageIntent, 以及 content.updating(from: 的方式來插入角色頭貼。只要在訊息安排前設定好即可,不需要在 delegate 或是其他地方做額外處理。這是我們在實作時遇到的另一個小卡點,測試後才知道原來這樣也行 🫠
結語
這裡我們介紹了如何在 iOS Swift 的訊息通知中增加角色大頭貼。地端訊息是「排程前先改好」,遠端訊息是「送達後再改」。核心邏輯基本一樣,差別只在哪段程式碼以及何時動手改。雖然整體上只不過加了一張小小的頭貼,卻能讓通知從冷冷的提醒,提升成角色的溫暖與問候。
參考資料
- Apple Inc. (n.d.). Implementing communication notifications. Apple Developer Documentation. Retrieved September 29, 2026
- Apple Inc. (n.d.). UNMutableNotificationContent. Apple Developer Documentation. Retrieved September 29, 2026
- Apple Inc. (n.d.). User Notifications. Apple Developer Documentation. Retrieved September 29, 2026
- Nightking. (Jul 21, 2024). How to set a custom icon to an iOS push notification? [Answer]. Stack Overflow. Retrieved September 29, 2026